
Getting Started with this Tiger Cane Thing
Alright, so I got this idea in my head, a “tiger cane.” Don’t ask me why, maybe I was just fiddling around, or maybe I thought it’d be a cool project. Anyway, I decided, why not give it a whirl? I’ve messed with wood before, but nothing quite like this plan I had.
Finding the Right Stuff and Tools
First up, I needed some decent wood. Couldn’t just be any old branch. I hunted around for a good piece of hardwood. To be honest, I’m not even sure what type it was, but it felt solid and had a good weight to it. Then I dug out my trusty carving knives – they’re old, but they do the job. Got some different grades of sandpaper, and figured I’d need some paints for the stripes eventually. Pretty basic setup, really, nothing fancy.
The Actual Work, Man, This Took a While
Getting the wood ready was the first real step. I spent a good amount of time just looking at the piece of wood, trying to visualize how a tiger’s head would look on one end. I even sketched a rough shape onto it with a pencil. Then, the carving began. It wasn’t quick, let me tell you.
- Shaping the head was probably the toughest bit. That took hours, and my hands were definitely feeling it.
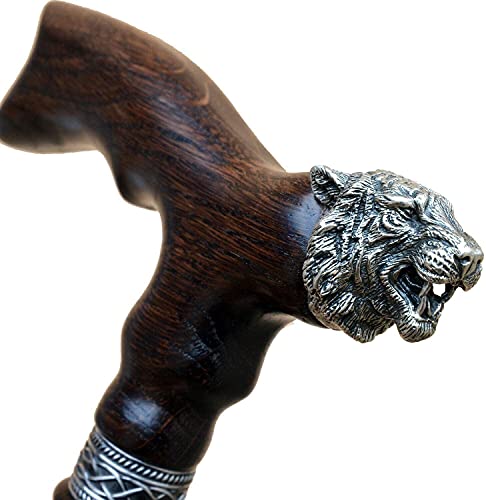
- Then I had to work on the shaft, making sure it was comfortable to hold and had a nice taper.
- Trying to get the tiger’s face to actually resemble a tiger, and not some kind of weird, lopsided cat, was a real test of patience. Lots of small cuts, stepping back, looking again.
I remember there was this one moment, I nearly binned the whole thing. A chunk of wood chipped off unexpectedly, right where an eye was supposed to be. I was gutted, thought I’d wrecked it. But then I just sort of worked with it, made the eye look a bit more menacing, you know? It actually turned out alright in the end, a happy accident I guess.
Making it Roar… Well, Look Like a Tiger Anyway
After what felt like forever carving, it was time for sanding. So much sanding. Dust was absolutely everywhere. But you could see it starting to take on a really smooth finish. Then came the painting. I’m no Michelangelo, that’s for sure. Getting those tiger stripes to look halfway decent was a mission. I went with a classic orange base, then the black stripes. Some stripes are definitely better than others, a bit wobbly in places. But that’s the charm of handmade stuff, isn’t it? Gives it character.
Once the paint was dry, I slapped on a few coats of clear varnish. That was to protect the wood and the paint, and it gave it a nice, subtle shine. Oh, and I stuck a rubber ferrule on the bottom – you know, one of those rubber cap things – so it wouldn’t slip on smooth floors. And that was pretty much it. Job done.
So, What’s the Big Deal About This Cane?
Look, it’s not perfect. If you get up close, you can see all the little imperfections, the spots where the knife slipped a bit. But it’s mine. I made it with my own two hands. It took up a fair few of my weekends, I can tell you that. And honestly, it feels really solid. It’s got a good heft to it. Way more satisfying than those generic, mass-produced canes you find in shops. Those things just feel so… bland. No personality.
Why did I even bother with this whole tiger cane project? Well, truth is, I had a bit of unexpected free time. My main gig, helping this small local business set up their online inventory system, just went belly up. The owner basically ghosted everyone, stopped taking calls, the whole nine yards. Left me hanging with a half-finished database and a load of frustration. So, instead of just stewing over that and staring at a computer screen, I figured I needed to do something practical, something with my hands. This tiger cane thing was just what I needed. Something I could actually start and finish, and see a real result. And now, well, I’ve got this unique cane, and a bit of a story to go with it. Not a bad trade-off, all things considered, eh?

