
Finally Taming COTA in F1 23 – My Setup Journey
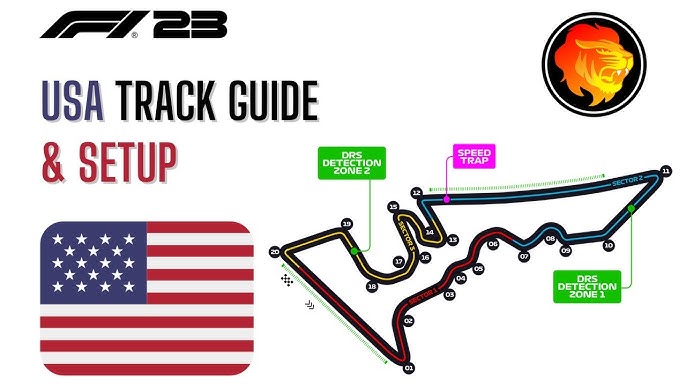
Alright, let’s talk about Circuit of the Americas in F1 23. What a track, eh? Love it and hate it sometimes. When I first jumped in with the default setup, man, it was a struggle. Like wrestling a greased pig. The car was all over the place, especially through those esses in Sector 1, and forget about getting any decent traction out of the slower corners. Just a complete mess. I knew pretty quick I’d have to roll up my sleeves and dive into the setup screen myself. It’s always the way, isn’t it?
Where I Started – The Aero Battle
So, first things first, I always look at the wings. The default aero often feels a bit generic, not really dialed in for specific tracks. For COTA, I felt it needed a bit less drag for those long straights but enough downforce to actually make it through Turn 3 to 6 without ending up in the cheap seats. I started by dropping the front wing to around 28 and the rear wing to about 26. It’s a bit of a dance, this. You take some off, do a few laps, feel it out. Too twitchy? Add a click back. Too slow on the straights? Take another click off. I spent a good chunk of time just going back and forth here, lap after lap. You get a feel for it eventually.
Getting the Power Down – Transmission Tweaks
Next up, the transmission, specifically that differential. COTA has some really tricky traction zones. Coming out of Turn 11, or that final corner onto the main straight – if your diff isn’t right, you’re just spinning your wheels and going nowhere fast. I found that lowering the on-throttle differential to around 55% really helped me get the power down smoother. Made a big difference. For the off-throttle, I kept it a tad higher, maybe 52%. This helps the car rotate a little bit when you’re off the gas, which is handy for those tighter sections. It’s all about finding that balance where it helps you turn but doesn’t try to send you into a spin.
The Suspension Saga – This Took Ages
Okay, the suspension. This is usually where I spend the most time, and COTA was no exception. It’s got bumps, you want to use those kerbs, and the quick changes of direction demand a car that’s compliant but responsive.
- Suspension Geometry: For camber, I went fairly aggressive on the front, something like -2.80 degrees, and a bit less on the rear, maybe -1.30 degrees. This helps with grip in the corners. Toe-wise, I usually run a tiny bit of front toe-out, say 0.05 degrees, for better turn-in, and a bit more rear toe-in, like 0.20 degrees, for stability under acceleration. Little changes here can make a big difference in how the car feels.
- Suspension Stiffness: This was a lot of trial and error. I ended up softening the front suspension to around 7 and the rear suspension to 4. It just felt better over the bumps and kerbs. Same with the anti-roll bars; I went for 6 on the front and 2 on the rear. Makes the car a bit more forgiving. Ride height is also key. You can’t slam it too low at COTA. I settled on 33 for the front and 37 for the rear. It seemed to be a good compromise.
You just gotta keep lapping, feeling what the car is doing, and making small adjustments. It’s not glamorous, but it’s how you find those extra tenths.
Brakes and Tyres – The Final Polish
Brakes are super important, obviously. I always run 100% brake pressure – I want all the stopping power I can get! But the brake bias is crucial. For COTA, I found around 56% to the front worked well for me. It helps prevent the rears from locking up into those heavy braking zones like Turn 12. As for tyre pressures, this is often the last thing I tweak. You want them to get into the right temperature window and stay there. I started with the fronts around 22.8 psi and the rears around 20.7 psi. After a few laps, you see how they’re wearing and heating up, and adjust accordingly. Sometimes just a click or two makes a difference.
The Result – It Actually Felt Drivable!
So, after all that faffing about, countless laps, and probably a few choice words muttered under my breath, the car started to feel… good! Way, way better than that initial mess. It was more predictable, I could actually attack the kerbs through the esses without the car trying to kill me, and I could get on the power much earlier. It wasn’t perfect – no setup ever is, right? – but it was a massive improvement. It’s like when you’re trying to fix something همکاری that’s broken, and you keep trying different things, and then suddenly, it just clicks. That’s the feeling.
Now, remember, this is what worked for my driving style and my controller. You might need to tweak these settings a bit to suit you. But hopefully, this gives you a solid starting point if you’re struggling to get to grips with COTA. The main thing is to experiment and find what feels right for you. Happy racing!

