My NFL Taylor’s Version Sweatshirt Project
So, I had this idea bubbling in my head for a while. You know how it is, you see stuff online, you get inspired, and suddenly you NEED to make something. That was me with this whole “NFL Taylor’s Version” sweatshirt concept.
I’m a big football fan, and well, Taylor Swift is kinda everywhere right now with her re-records. “Taylor’s Version” this, “Taylor’s Version” that. It just clicked. Why not combine the two things I was enjoying?
Getting Started: The Hunt for Supplies
First things first, I needed a blank sweatshirt. Just a plain, comfy one. I didn’t want anything too fancy because, you know, I was gonna mess with it. I popped over to my usual craft store. They always have a decent selection of basics. Found a good, solid color that I thought would work well.
Then, the important part: how to get the design ON the sweatshirt. I thought about a few ways. Embroidery? Nah, too much patience required for that, and my skills are, let’s say, basic. Paint? Could get messy. So, I landed on iron-on vinyl. Seemed like the most straightforward route for what I had in mind. I grabbed a couple of colors that I thought would pop.
The Design Phase: Making it Look Right
Okay, this part took some thinking. I had the team I wanted to rep, obviously. That was the easy bit. The tricky part was getting that “Taylor’s Version” look. You know, the specific font and that little “(Taylor’s Version)” tag.
I spent a good chunk of time on my computer, messing around with design software. It’s nothing super professional, just a basic program, but it gets the job done. I hunted for a font that looked close enough to the album covers. Then I started arranging the team name with the “(Taylor’s Version)” underneath. Fiddled with sizes, spacing, all that jazz. Wanted it to look cool, but not too perfect, if you know what I mean. A little bit of that homemade charm.
Bringing it to Life: The Ironing Saga
Alright, design finalized. Time to cut the vinyl. I have one of those little cutting machines. Sometimes it behaves, sometimes it decides to have a mind of its own. This time, thankfully, it was mostly cooperative. Got all my letters and elements cut out.
Next up, weeding the vinyl. That’s the process of peeling away all the bits you don’t need. It can be a bit tedious, but also kinda satisfying. Once that was done, it was time for the main event: ironing it onto the sweatshirt.
This is where you gotta be careful. Placement is key. I laid the sweatshirt out flat, smoothed out all the wrinkles. Then I carefully positioned the vinyl pieces. Measured a few times, eyeballed it, moved things around a tiny bit. You only really get one shot with this stuff.
I don’t have a fancy heat press, just my regular household iron. Set it to the right temperature (no steam!). Placed a thin cloth over the vinyl and pressed down hard. You gotta hold it for a bit, make sure it really adheres.
There was a moment of slight panic with one of the smaller letters. It didn’t quite stick on the first go. Gently peeled back the carrier sheet, saw it lifting, and thought, “Oh no!” But a little more targeted heat and pressure, and it finally decided to stay put. Phew.
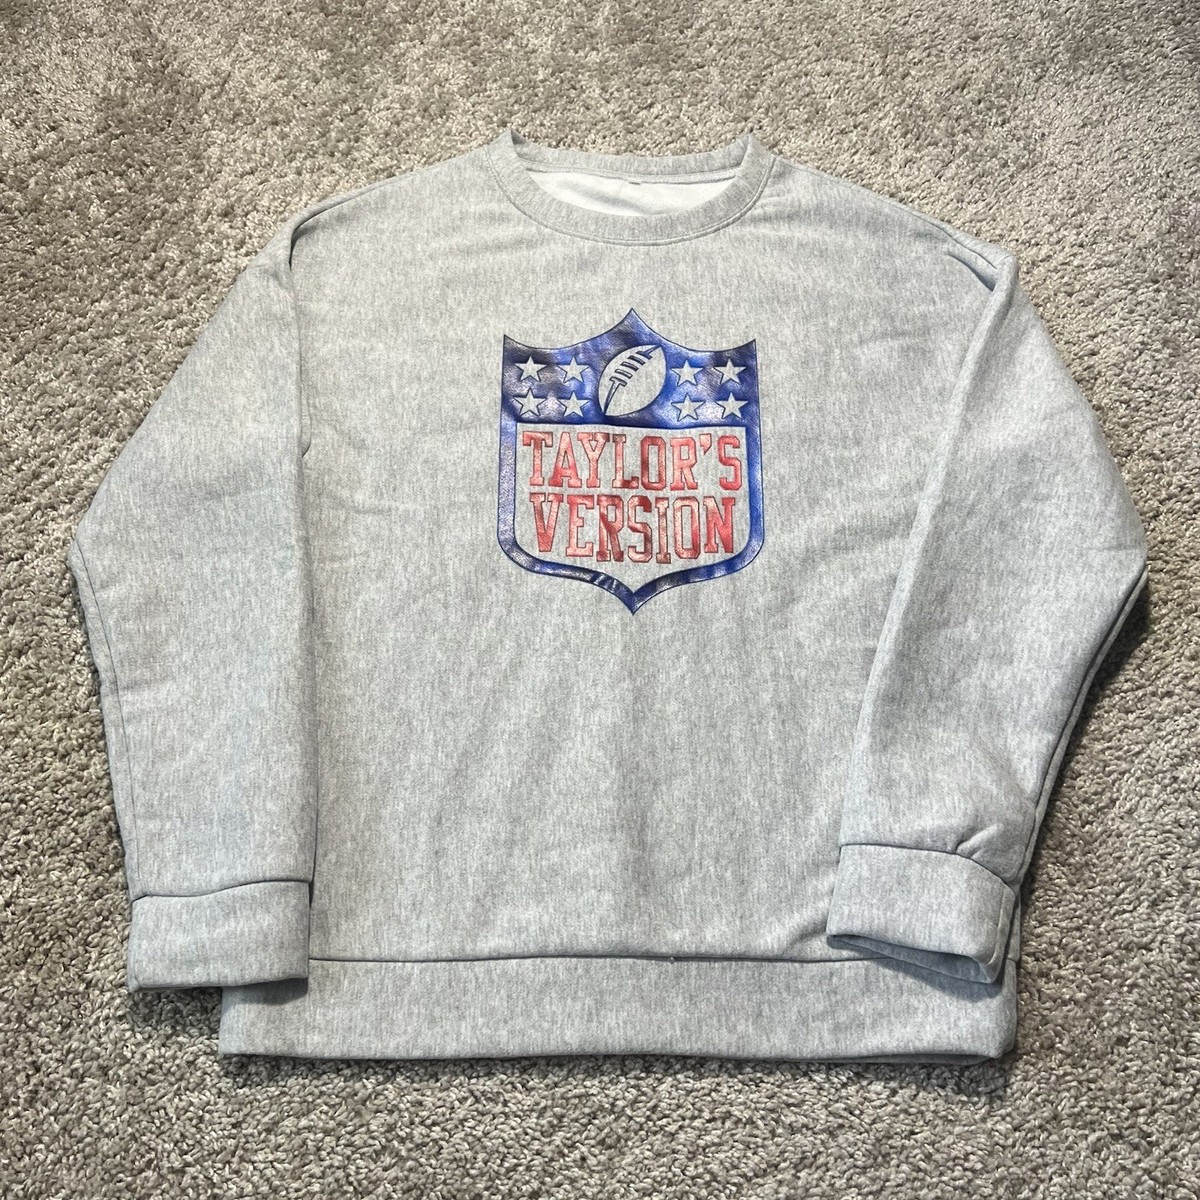
The Final Result: Pretty Pleased!
After all that, I let it cool completely, then carefully peeled off the clear carrier sheets from the vinyl. And there it was! My very own NFL Taylor’s Version sweatshirt.
- The team name looks sharp.
- The “(Taylor’s Version)” tag underneath just ties it all together.
Honestly, I was pretty chuffed with how it turned out. It’s unique, it’s comfy, and I made it myself. There’s a certain satisfaction in that, you know? It’s not store-bought perfect, and that’s kind of the point. It’s got character.

Now I just need to decide when to debut it. Game day, maybe? Or just for lounging around, feeling like a crafting champion. Either way, it was a fun little project, and I ended up with a cool new piece of gear.

